 Welcome to the second in a four-part series that will provide real-world advice about portable PA systems, co-presented by Yamaha and Performer Magazine. In this installment, we’ll take a closer look at setting up your portable PA system for the first time, including configuring both the mixer and speakers that are included in your portable PA package.
And if you’re in the market for the best electric guitars to go with your new PA rig, check out bestelectricguitars.reviews.
DON’T MISS PART ONE: What is the Best Portable PA System for Your Band?
and
PART THREE: How to Control Feedback and Mix Sound for House Concerts
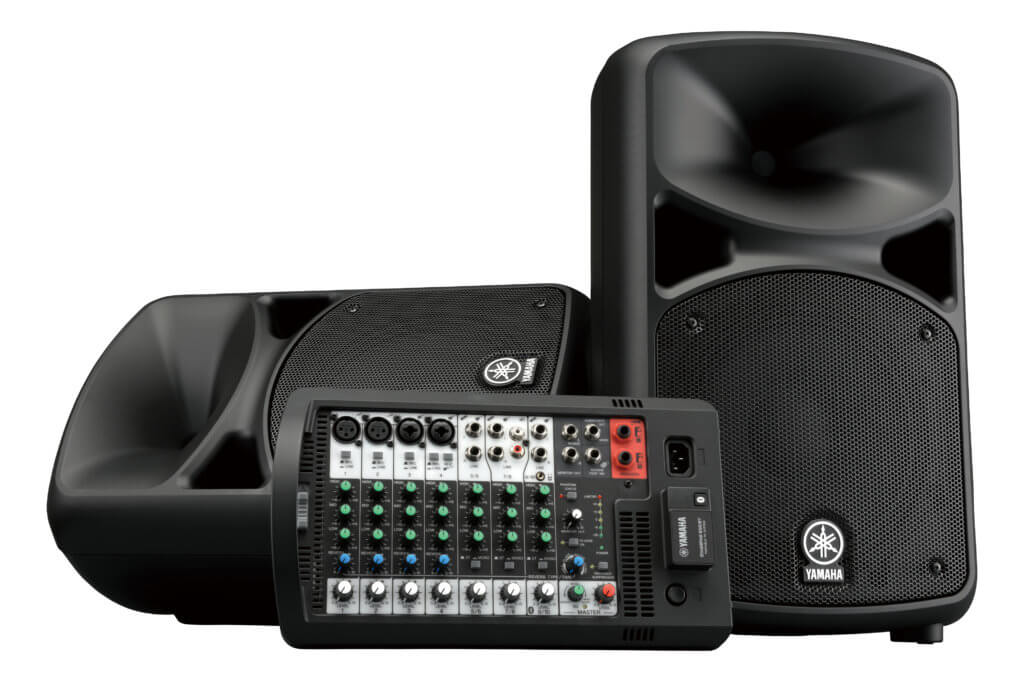
Once again, Yamaha has been kind enough to loan us a number of products and accessories from their professional audio range, which we’ll be incorporating into our series as we go – including the new STAGEPAS 400BT, a powerful portable PA system with Bluetooth, and its sister units the STAGEPAS 400i and STAGEPAS 600i.
Let’s begin by looking at the basic setup procedures for your first portable PA system. Keep in mind this series is aimed more toward new users. For more advanced live sound tips, we recommend you check out our FREE Guide to Getting Better Live Sound, also co-presented by Yamaha.

Handy input diagram included on the back of the STAGEPAS 400BT portable PA system
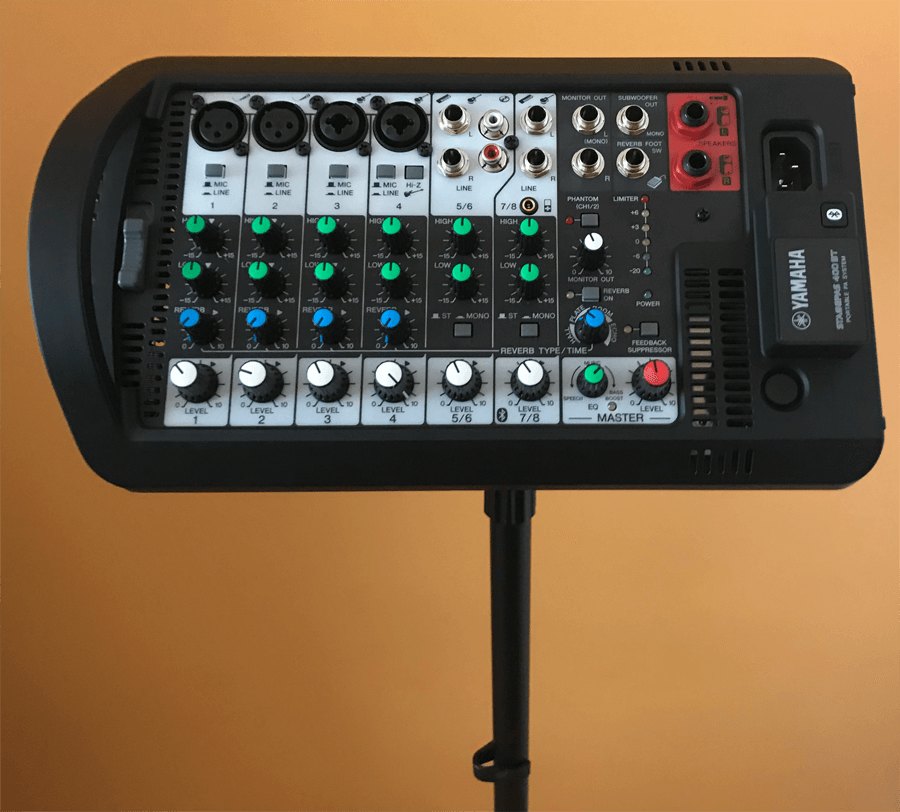
GETTING STARTED WITH YOUR MIXER
Since sound travels from your microphones and instruments to the mixer first before anything hits the speakers, we’ll start there as our first set-up point.
To start, remember safety first. Now, while you probably won’t cause damage to most modern solid-state gear by plugging it in with the power switch already engaged, why take the chance? Make your connections first, then turn on the power.
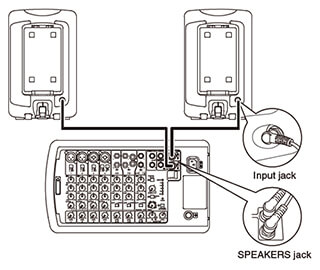
The good part here is that since you’re working with an integrated system that was designed to function together, the hookup between your mixer and speakers should be simple. In most cases everything should be clearly labeled, come with the necessary cables and the connections between your mixer output and speaker inputs will match since they were designed that way. If you’d purchased a separate mixer and PA speakers, you would have had to make sure that both featured the same types of connections. For example, a mixer with only balanced XLR outputs and speakers with 1/4” inputs aren’t going to work together.
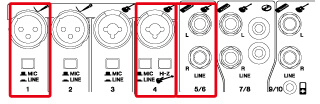
But again, portable PA systems are designed to match, so you’re in the clear. Make sure your vocal mics and instrument mics are plugged firmly into the appropriate channels of the mixer with quality XLR cables, and that phantom power is engaged for any condenser mics that might require it. The STAGEPAS models we’re featuring also have Hi-Z inputs, which are super handy for plugging guitars and basses (high imprudence sources) direct without the need for additional DI boxes. Just push the Hi-Z button on the channels that support it to engage the proper connection.
Now you can power everything on.
SOUND CHECK
With all of your instruments and vocal mics routed through the mixer, it’s time to get a level check. The nice part of the STAGEPAS lineup is the addition of a master volume level. If you’re coming from the guitar world, you may be familiar with the master volume feature of your amplifier. For small to medium gigs, or performances where other audio sources still need to be audible (conversation at a wedding gig’s cocktail hour, speeches at corporate gigs, etc.), it can be handy to be able to keep the overall volume limited, while adjusting individual channel volumes to taste.
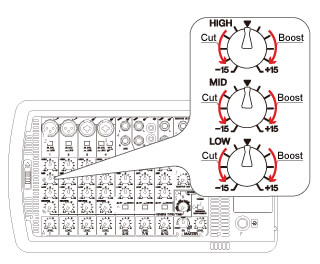
Each channel of your mixer will have usually its own overall volume control (typically at the bottom of the channel strip either via a fader or knob) and additional EQ parameters as well as fx settings. You may also find that you have global settings on your mixer that apply to all active channels, such as additional fx, reverb, feedback suppression and more.
NECESSARY SETUP ACCESSORIES
One of the nice things about portable PA systems is that the mixer is typically compact enough to travel well (hence “portable”) but oftentimes this means that finding a place for it on stage, from a logistical standpoint, can be a challenge. Luckily, many manufacturers provide handy mounting solutions that alleviate this problem, and allow you to control the mixer easily during performances without the need to “MacGuyver” a solution. We’ve been using the Yamaha M770 mixer stand during our tests, which makes things super-simple.
STAGEPAS 400BT on Yamaha M770 mixer stand
Another handy accessory you might want to add to your set-up process is a function-specific footswitch. Now, while not all portable PA systems come with this capability, our STAGEPAS 400BT allows you to use the optional FC5 footswitch for controlling reverb. In fact, the same footswitch doubles as a sustain pedal for your synths, so if you already have one for your keyboard, give it a try with your STAGEPAS to see how well it controls reverb with the gentle press of your foot. You might be surprised at how useful a feature that can be on stage, on-the-fly.
BLUETOOTH PAIRING
The last setup duty you might want to take care of before the gig starts is to pair your Bluetooth device with your portable PA, especially if you plan on streaming backing tracks or “break music” during your intermissions. Typically, the device you’re streaming from will be able to locate your portable PA system automatically when Bluetooth is enabled in your device’s settings, so set up should be a breeze. STAGEPAS also lets you pair up to 8 devices, so all of your band members can pair their devices.
Pairing is pretty straightforward – hold down the Bluetooth button for a moment to arm STAGEPAS for pairing. The Bluetooth light will start flashing at this point. Enable Bluetooth on your device, if you haven’t done so already, and select your STAGEPAS model from the device list on your phone or tablet. Once you’ve finished pairing, the Bluetooth light on your STAGEPAS will remain steady.
Once you’re paired, the process for connecting your device the next time you want to use it is just as easy. Press and hold the Bluetooth button for a second, the Bluetooth LED will flash, and you’ll select your STAGEPAS model from the device list on your phone or tablet. Depending on which STAGEPAS you are using, Bluetooth signals will route to either channels 7/8 or 9/10.
PRO TIP: If you’re using a phone for music playback, you can put the phone in airplane mode to eliminate the annoyance of alerts and phone calls for your audience.
SPEAKER MOUNTING
We’ve spent the majority of this installment talking about the mixer, but sufficient time should also be spent positioning your PA speakers for the best sound depending on your particular venue. A general rule of thumb is that the main PA speakers should be higher off the ground than the tallest audience member. So, a good 6-8 feet high is a general starting point. You want the sound to project to the rear of the venue, and not be blocked by audience members if the speakers are placed too low off the floor. You also want high-frequencies to be able to travel, as opposed to being absorbed by physical objects in their way.
Even though you’re using a portable PA system, you should still have industry-standard mounting options available. The STAGEPAS units, for example, are all easily pole-mountable. We’ve got our up on sticks, and have even used them as wedge monitors. Even better, they feature StageLok connectors, which ensure that your speakers are mounted quickly and securely, and aren’t going to change positions once they’re set-up.
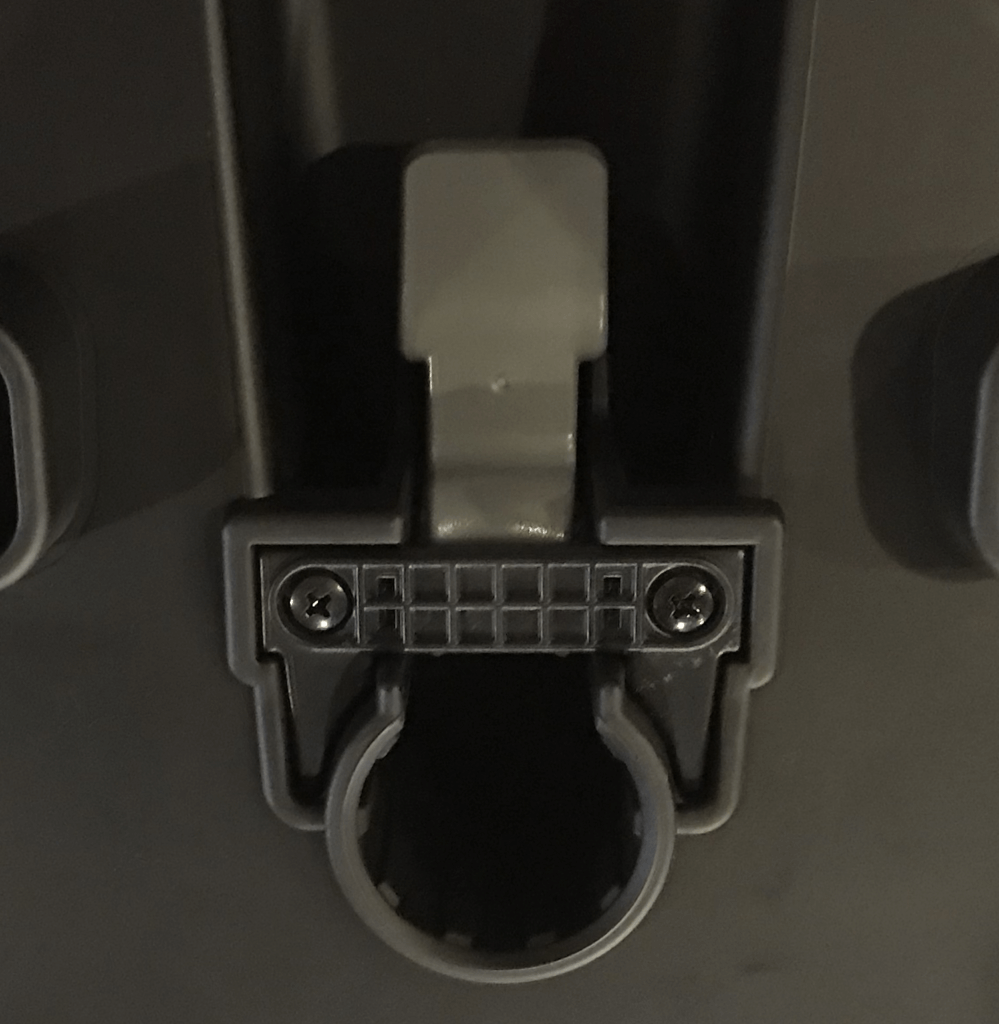
Example of StageLok system on Yamaha STAGEPAS 400BT speakers
The nice thing about a portable PA system is that total set-up time can be under 2 minutes once you’re got the hang of things. And since most systems, like STAGEPAS, are designed for ease-of-use, it’s really just a matter of making the connections, adjusting your mix, and positioning the speakers for the best sound possible.
CLOSING THOUGHTS
Now, keep in mind these are the basics you’ll need to get started when setting up your portable PA system. Head to https://usa.yamaha.com/products/proaudio/index.html to learn more and to find the portable PA products and accessories that will fit YOUR band’s needs.
Stay tuned for upcoming parts of the series that will focus further on mixing house concerts and non-traditional venues, as well as more advanced pro tips for mixing vocals with singer/songwriters. Until then, be sure to check out the entire range of Yamaha Professional sound products here and follow Yamaha Music USA on Facebook and Twitter.