EQ Eight:
This equalizer is my whole life. My mixes live and die by this EQ. Equalization is the most important part of mixing, and I honestly believe it needs to be done to every element in your mix.
The EQ Eight features eight parametric filters per input channel. Each filter has a chooser that allows you to switch between eight responses. From top to bottom in the choosers, these are:
- 48 or 12 dB/octave Low cut (cuts frequencies below the specified frequency);
- Low shelf (boosts or cuts frequencies lower than the specified frequency);
- Bell curve (boosts or cuts over a range of frequencies);
- Notch (sharply cuts frequencies within a narrow range);
- High shelf (boosts or cuts frequencies higher than the specified frequency);
- 12 or 48 dB/octave High cut (cuts frequencies above the specified frequency).
The EQ Eight has an output spectrum analyzer enabled for you, to give you a visual interpretation of your equalization.
My biggest reason for using the EQ Eight is cleaning up mud in my mix, so here are a few tips:
Low End: Try less sub more (80Hz – 140Hz) on the kick drum;
Mid-Range: Try cutting (450Hz – 800Hz) for a clearer top end;
Highs: Use Panning and Stereo Separation/Width to avoid too much build up in one spot.
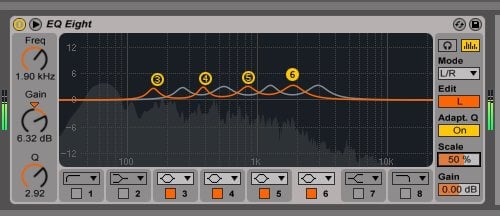
EQ Eight in Ableton Live
Compressor (Sidechain):
I make a lot of dance music, and without sidechain or ducking my mixes would be a disaster. Sidechaining is extremely important because it can help in ensure that your bassline will make room for the attack of your kick drum, since they will be competing for the same low frequencies. I also sidechain tons of other elements in my mix. My bassline with my sub, or my snares with my effects. Anytime I want to bring one element out of the mix, but it might be competing with the same frequencies of something else, I use a sidechain compressor. The compressor in Ableton is perfect. If you’re trying to bring out a kick drum with a competing bassline, just insert a compressor on the bass track, and unfold the compressor window. Then select the sidechain parameter, and where it says “Audio From” is your input. Select your Kick drum channel in your input. Your compressor will now be enabled every time your Kick drum hits.
Good Starting point for Bass/Kick Sidechain Compression:
Attack: 1ms
Release: 30-50ms
Ratio: 6:1
Threshold: Adjust by using your ears
Simple Delay (Haas Effect):
Works best on pads, strings, or any big lead in your track. The goal of using the Haas effect is to make a sound bigger, fuller, and wider. Within Ableton you can achieve this effect by dropping a Simple Delay onto your channel. Make sure you don’t have the link button enabled, and switch the settings on the delay from “Synch” to “Time.” Set the left channel to any number between 5-20ms, and then the right channel to any different number in that same range. Don’t go outside that range of numbers or it will make your track sound very strange and wacky, and not in a cool way! Then make sure your “Dry/Wet” knob is up all the way to 100%.
Multi-Band Dynamics (OTT Compressor):
“OTT” stands for Over the Top, and that’s exactly what this aggressive compressor is. I love using this on my basslines, to make them sound fuller. If my bassline has some reverb on it, that’s bonus points.
The OTT uses Upward Compression, which is an uncommon type of compression. You use this to make quiet signals below the threshold louder. I typically use it on my basslines to round off the highs to then enable greater amplitude and grunt to the lower frequencies.
The best way to envision what the OTT is doing from my perspective is when it’s inserted on the bass channel, you are heavily compressing the signal. By using the “Dry/Wet” knob you can then blend between the super compressed signal and uncompressed signal.
Corpus (Kick Tight):
Always throw this on my Sub and Kick Drums. Super useful effect, but needs to be used with caution. It can make your Kick go from amazing to unlistenable real quick.
Corpus is an effect processor that will allow you to add the synthetic layer to anything it is applied to.
The Kick Tight Pre-set is great because when enabled it becomes an effect processor that allow us to add girth and body to weak kick drums. Try it out but be careful with the “Dry/Wet” Knob, so you don’t overdo it. I’d say stick to 30%-50%.
ABOUT THE AUTHOR
Jon Vetri is a DJ, producer, and A&R Manager at Wind-up Records and has worked closely on the launch of Eclypse Records, not to mention with bands like The Griswolds, Crobot, and Civil Twilight.