If you are a songwriter who wants to record better demos and more professional sounding recordings on a budget, this article is for you. I am going to cover the basics and a few advanced tips for recording your music using the DAW (digital audio workstation) Reaper.
What is Reaper?
Reaper is a full-featured DAW (digital audio workstation) developed by Cockos Incorporated. It has a comprehensive suite of effects and features that rival far more expensive products such as Pro Tools or Logic. Additionally, Reaper can use any VST (virtual studio technology) available to Pro Tools, allowing you to have state-of-the-art effects and virtual instruments.
Reaper Pricing
Cockos allows you to download a fully-functional, 30-day trial of Reaper to get you started. After 30 days, the product is still fully-functional but adds a 20 second nag screen at startup. When you decide to purchase it, it is reasonably priced with both a discounted license and commercial license. The discounted license is $60 for individuals or businesses with gross revenues of less than $20,000 per year. The commercial license is $225.
The discounted license and commercial license are the exact same product. Cockos uses an honor system, counting on their consumers to pay for the product honestly. I honor that by paying for the appropriate product.
After you use it for a while, you’ll agree it is a fair price.
Reaper comes with a quick start guide, a guide to some of Cockos’ supplied effects, and a detailed manual that is several hundred pages long. There is also an active and helpful community on the Reaper forums and on the Reaper Facebook group.
Audio Recording Chain
In order to record music into Reaper you need, at minimum, an audio input device, a microphone, a mic-stand, and a pop-filter. Of course, you’ll need XLR and instrument cables as well.
Your Audio Input Device
Normally this will be a USB device like the Focusrite 2i2 or 2i4. The device will typically include two to four XLR/instrument combo inputs with pre-amps and gain controls. Your audio input device will need phantom power if you have a condenser mic that requires it.
I started with a Steinberg (Yamaha) UR22 and used that alone for a couple years. In the past year I added a mic preamp and a compressor to give me greater controller and warmer recordings than the audio input device alone could provide.
The following represent what an audio input chain might look like:
Microphone
⇓
Input Device
⇓
Computer
⇓
Reaper
Or, as indicated above, my current input chain looks like:
Microphone
⇓
Preamp
⇓
Compressor
⇓
Input Device
⇓
Computer
⇓
Reaper
In most cases, your PC will find and install the device drivers as soon as you plug in the device. Once it is added to your system, it will be available to Reaper. Let’s jump into the Reaper interface and your first recording.
The Reaper Interface
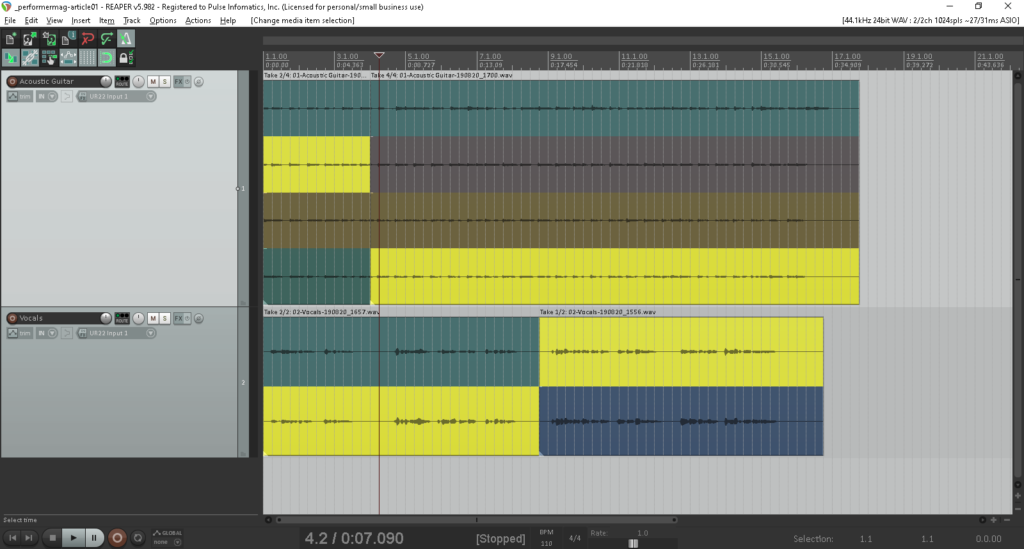
Reaper has a ton of features and is highly-customizable. We are going to cover the most basic elements of the Reaper interface as noted in the sample images.
The Track Panel
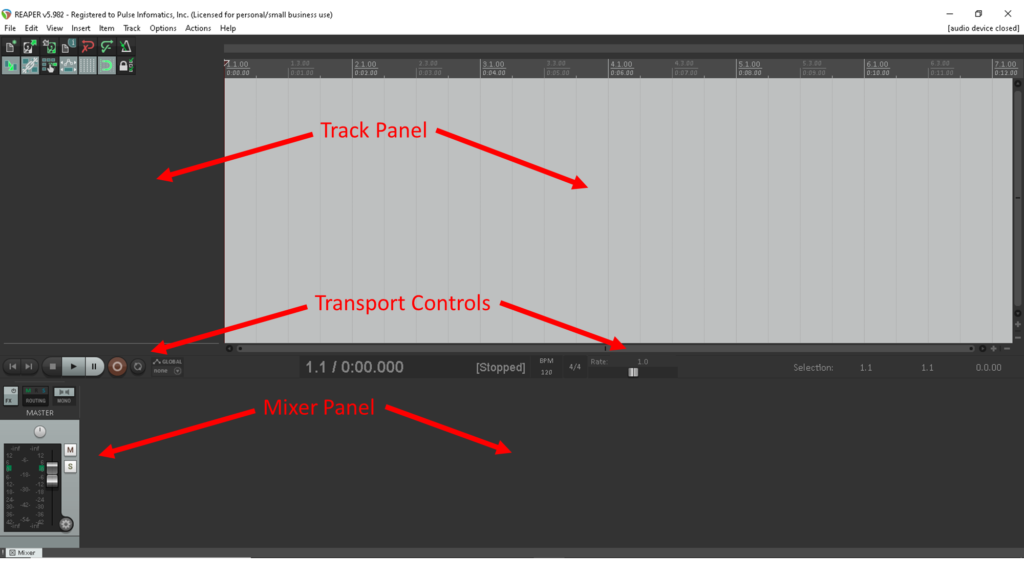
The track panel is where you will do the bulk of your work in creating, recording, and editing tracks. It will display tracks on top of each other, allowing you to line up audio elements like guitar, vocals, bass, and percussion.
The Transport Controls
The transport has the controls to start and stop recording, bring your recording cursor back to the start of your project, set your beats per minute (BPM), and even playback speed.
The Mixer Panel
The mixer gives you finer control over each track allowing you to set your playback levels, pan your audio left or right, and set any fx levels.
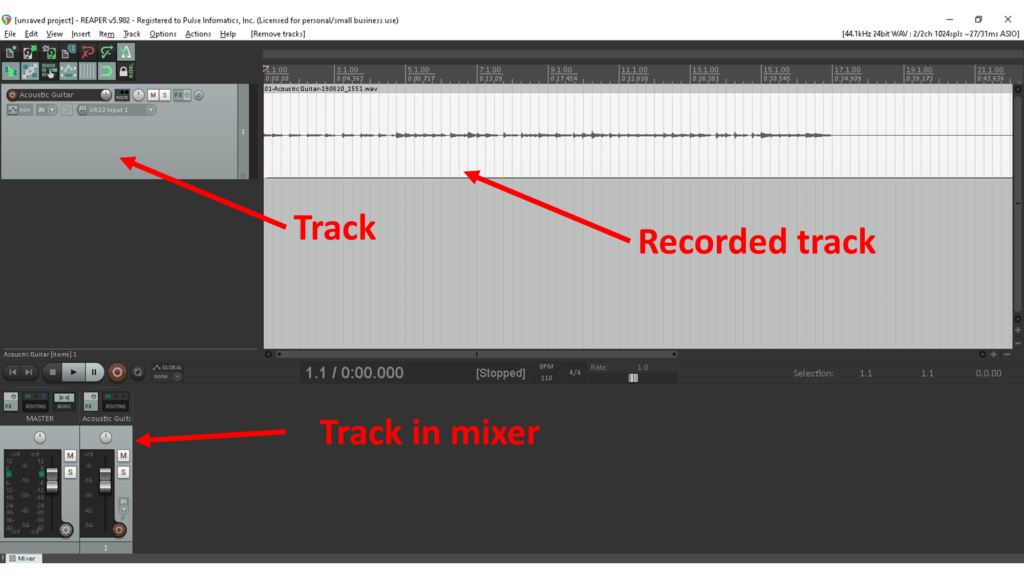
Your First Track
In order to add a track to reaper, double-click your mouse on the dark leftmost area of the track panel. You can also insert a track by pressing <Ctrl+T> on a PC or <Command+T> on a Mac. Finally, as with most commands, you can find the same command in the Reaper menu under Track->Insert Track.
Name your track by clicking in the Track Name box. I’ll be adding two tracks. Acoustic Guitar and Vocals.
Your Interface & Microphone
At this point, you should have your interface plugged in and powered on. Most smaller interfaces get power from the USB port. Plug-in your microphone and turn on phantom power if required.
Your microphone should be setup on a mic stand and have a pop-shield/pop-filter in front of it. The pop-filter is to reduce plosives that are caused when singing certain consonant sounds like the letter “P” or “B.” These sounds can often cause a blast of air to hit the microphone and are difficult to remove from your recording.
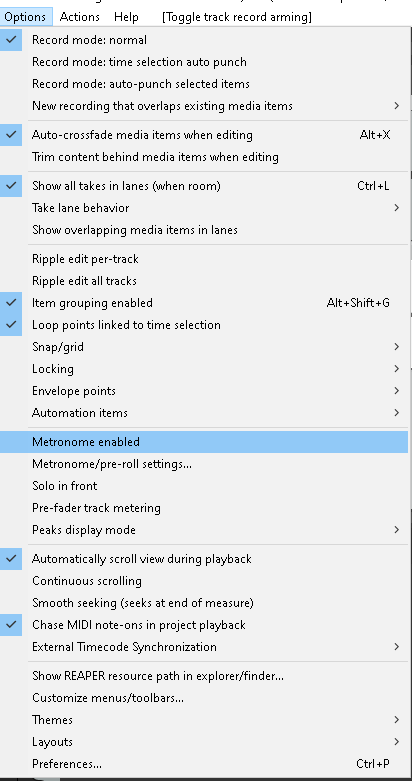
Using Reaper’s Metronome/Click
In order to record in time, you can use Reaper’s built-in metronome. You enable the metronome under the Options->Enable Metronome.
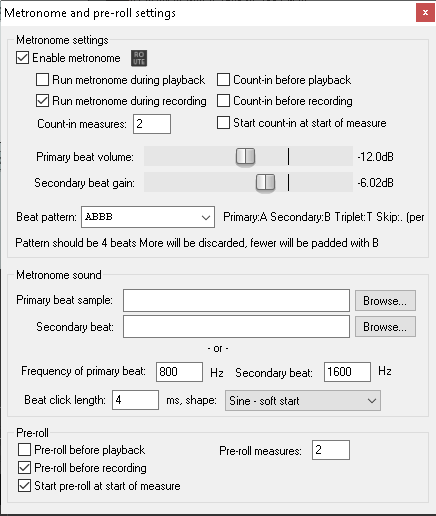
Metronome Settings
Under Options-Metronome settings you should consider setting the metronome to run during recording and near the bottom, to include a pre-roll during recording.
Setting the pre-roll gives you a number of measures to prepare yourself to record. The default setting is two measures, which will give you 8 clicks before recording starts. Later, I’ll explain what I use instead of the metronome but to get started, this is effective.
Arm Your Track
You arm your track by clicking the red button in the upper left of a track’s controls. Assuming your input is set to the interface channel your mic is plugged into, once you arm the track you’ll begin seeing a signal in the track channel mixer and the corresponding channel in your mixer panel.
Set Your Recording Levels
Using your input device, set your levels to ensure you do not “peak” or overload the input signal. If you do, your recording will sound distorted. Whenever possible, try to keep your recorded signal below -6db. This will allow you to add fx and increase volume as needed without overloading the channel signal. Learn more about proper gain staging in future articles.
Record Guitar
Your mic stand should be positioned so that your microphone is at the same height/level as your guitar. Position yourself 5 to 10 inches from the microphone. Most engineers suggest pointing your microphone at the 12th fret of your guitar. However, you should experiment with the distance and position of your guitar to capture the sound you want.
For instance, for a softer tone, I sometimes play slightly angled to the side of my microphone (off-axis) and, depending upon how hard I may be playing, increase or decrease my distance. There is both science and art to getting the sound you want.
Press the record button on the transport to begin recording your guitar. <Ctrl+R> or <Command+R> will start the recording as well.
Remember, your metronome will give you 8 counts before the recording starts. Depending upon your setup, you can increase that to 4 measures, or 16 beats, to give you time to get comfortable in front of your microphone. Once you are done recording, press stop or the spacebar and save the audio file. You will see a visual representation of your audio’s soundwave in the track panel area.
Multiple Takes
Keeping the guitar track armed, you can record multiple takes of the guitar. As you record, you’ll see the track being recorded but upon stopping the recording, you’ll see several takes stacked on top of each other. Later, you can cut and edit a track, selecting the best sections of each take to include in your final recording.
Record Vocals
Disarm the track and then arm your vocal track. Set your microphone stand to a height that allows you to sing into the microphone comfortable and press record. You will hear your guitar in your headphones and can now sing over the guitar you recorded. Once you are done, you can play back the recording, hearing your vocals over the guitar track. As with the guitar track above, you can record multiple takes to get the best performance.
Editing Your Audio
Editing is performed by “splitting” a track. When you split a track, you can zoom in or out to select more or less of a track. For instance, if you’ve recorded four takes of guitar, you may find that the first four bars (measures) of track two sound the best but Take 4 is better in all other areas.
Place your cursor at the end of the fourth measure, place your mouse over the track you wish to split, and press the “S” key. Select the second take to the left of your cursor and right-mouse click, selecting “Take->Lock to Active Take”. Then select the fourth take to the right of your split, right mouse click, and select the same – “Take->Lock to Active Take”.
This will cause your recording to play the first four measures of take two and then switch to take four for the remainder of the song. The same should be done for your vocal track.
Output Your Song
You can create a final version of your song using the “File->Render” menu. It gives you the option to save the file in a number of formats including .WAV or .MP3. You can also render just a section of the song to send someone a small sample.
Advanced Tips
Tip #1: Record a Scratch Track First
I record a scratch track, in the right time signature and BPM, as a map. The track is me playing basic guitar and singing vocals. But it is a throw away track that will not be included in the final mix. It provides a guide that I can record to.
I do this because it is difficult to record guitar without any vocals and recall where you are in the song. I record the scratch track and then record my “real” guitar track while the scratch track plays in my headphones. In this way, my guitar track is recorded with more “realistic” feel because I am playing along to myself. Next, mute the scratch track and record vocals over your “real” guitar track.
Tip #2: Replace the Metronome with MIDI Drums
Assuming you are recording a song in 4/4 time, a four-count click can lack the feel of your actual song, which may be better recorded with a more realistic rhythm. Reaper includes a MIDI editor and there are a number of low-cost and free MIDI drum-kits.
I use a few pre-set MIDI drum tracks and use those to record instead of the metronome. Usually they’ll include a closed high-hat hitting 8th notes and a basic bass drum and snare combo. If my song has a more percussive and syncopated feel, I’ll edit my drums to better match that feel.
Conclusion
We did not touch on applying fx or more advanced techniques like routing. Suffice to say, Reaper can accomplish all of these advanced features and much more.
Studio time can be expensive. Taking the time to learn a little bit more about recording with Reaper can give you more complete recordings or let you prepare and arrange songs for when you do go into the studio.
Visit Reaper.fm and give reaper a try.
ABOUT THE AUTHOR
Matthew Moran is a songwriter & performer, author, podcaster, and technologist based in Los Angeles, CA. He performs solo shows and with his band, Arrogant Sage. He often provides workshops to business groups and musicians on content marketing, collaboration, and useful technologies. You can find out more at: https://MatthewMoranOnline.com