Audio-Technica and Performer Magazine team up to provide practical how-to information on recording snare and kick drums.
![]()
Welcome to the second in a four-part series that will provide real-world advice for setting up your home recording studio to record a full drum kit, co-presented by Performer Magazine and Audio-Technica.
DON’T MISS PART ONE: The Best Drum Microphones for Your Home Studio
and PART THREE: How to Record Drums: Miking Overhead Drums and Cymbals
In this installment, we’ll take a closer look at the best techniques for recording snare drums and kick (or bass) drums during your sessions. In upcoming installments, we’ll go into more detail about specific drum recording and miking techniques for cymbals, hi-hats, overheads and even adding effects like reverb, delay, room ambience and gating to your mix.
TYPES OF MICROPHONES FOR RECORDING SNARE DRUMS
As we mentioned in part one of our series on recording drums, the snare is all about attack, and capturing that attack is the key to a (traditional) snare sound. We recommend good quality dynamic instrument microphones, or condenser microphones with high SPL ratings to really get the “thwack” attack that will form the rhythmic punch of your track. The better the mic is at handling the initial loud hit of the snare, the less likely you’ll be pushing your preamps into the red and causing non-musical, unwanted distortion or clipping in your drum mix. If you’re recording to tape, though, you can always try experimenting with a slight push into tape saturation; you may find that rock drums benefit greatly being “pushed” a tad, using the analog tape medium as a musical “glue” to hold a slightly hotter drum mix together in an aurally pleasing way.
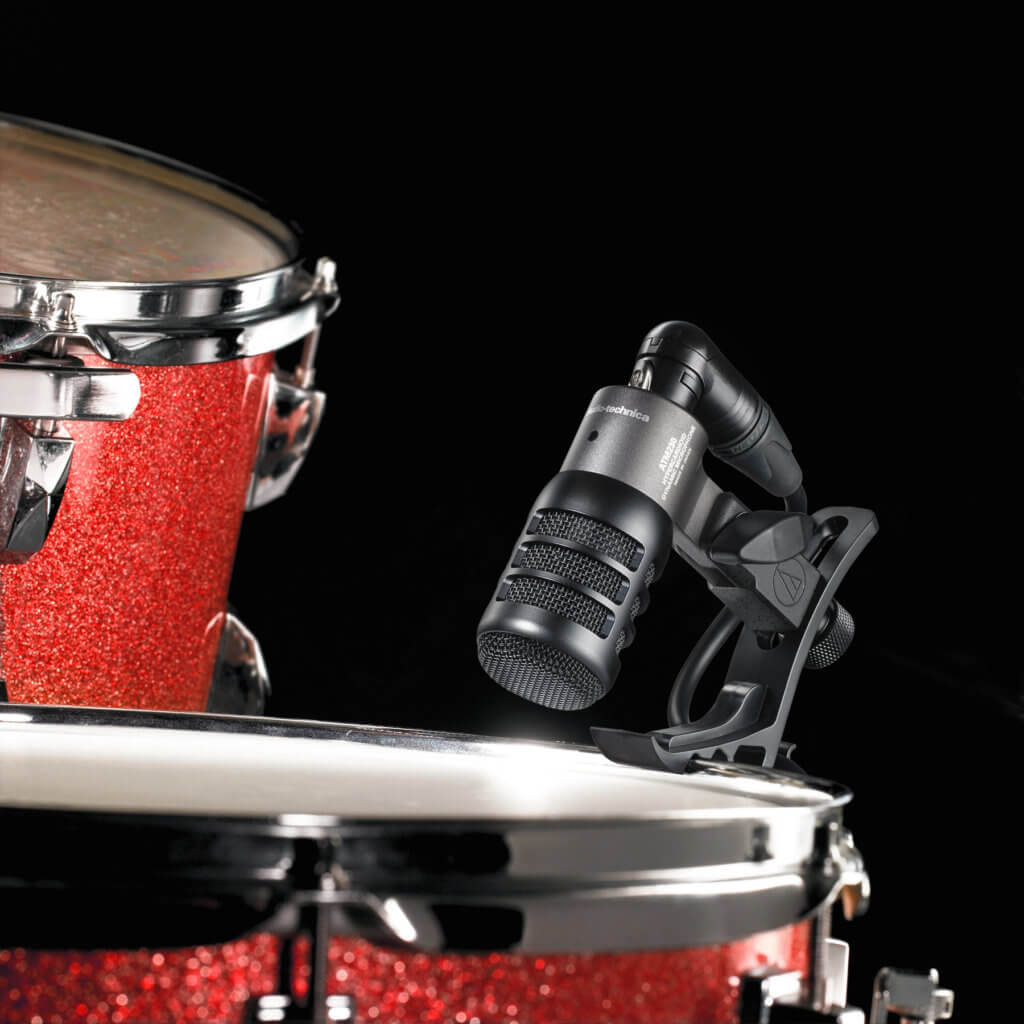
POSITIONING MICROPHONES AND TECHNIQUES TO RECORD SNARE DRUMS
Here are some tips from our friends at Audio-Technica on snare drum recording techniques:
- Try using two mics on the snare, one above and one below. Above, we’d recommend a hypercardioid dynamic instrument mic, like the ATM650. This will capture the snare’s attack without clipping due to the high attack volume. On the bottom, as mentioned previously, you can choose to use another dynamic instrument mic or go with a nice condenser that’s spec’d at high SPL.
- PRO TIP: make sure the bottom mic is flipped out of phase at the preamp stage so that you’re not canceling out waves and ending up with an unnaturally “thin” snare attack in the mix.
- As far as positioning goes, get as close as possible without clipping; the thing to avoid is a mic placed too far from the snare, as you’ll not only lose the attack you’re seeking, but more troublesome will be the bleed from your hi-hat, toms and cymbals that’ll be picked up by the mic and muddy your mix. Try to position the top microphone between your hi-hat and rack toms, and remember that the closer you get to the snare head, the boomier and more low-end frequency accentuation can occur. To combat this, you can angle the microphone closer to the middle of the snare head, which will help accentuate the attack and relieve some of this low-end pickup.
- For the bottom mic (if you plan on going this route), you’ll again want to place the microphone as close to the bottom of the snare (and centered) as possible to minimize any potential bleed from the other parts of the kit, but not so close that it’s touching the actual drum.
- Feel free to experiment. You could try top-miking with a single condenser and opt not to use any dynamic instrument mics at all. Sometimes this might suit a more dynamic or quiet playing style, such as jazz with brushes, as it’ll enable you to capture a slightly brighter top-end and open up your snare track in the mix.
THE BEST MICROPHONES FOR RECORDING KICK DRUMS
We called the snare the rhythmic punch of your drum track; conversely, the kick drum is the heart beat of your track. As stated in part one of this series, kick drums can be deceptively tricky to record properly in the studio. If possible, we recommend using a large dynamic instrument mic inside the shell, for two specific reasons. First, it aids in capturing the organic “thump” and pound of the kick drum, plus it keeps the microphone from picking up other parts of the kit. Bleed is not something you want in a tight bass drum sound, so do everything you can to isolate the inside mic, and you’ll help avoid that issue when it comes time to mix. You’ll also likely want to place a close mic outside, in front of the head, to help round out the sound and get the fullest kick possible for mixing.
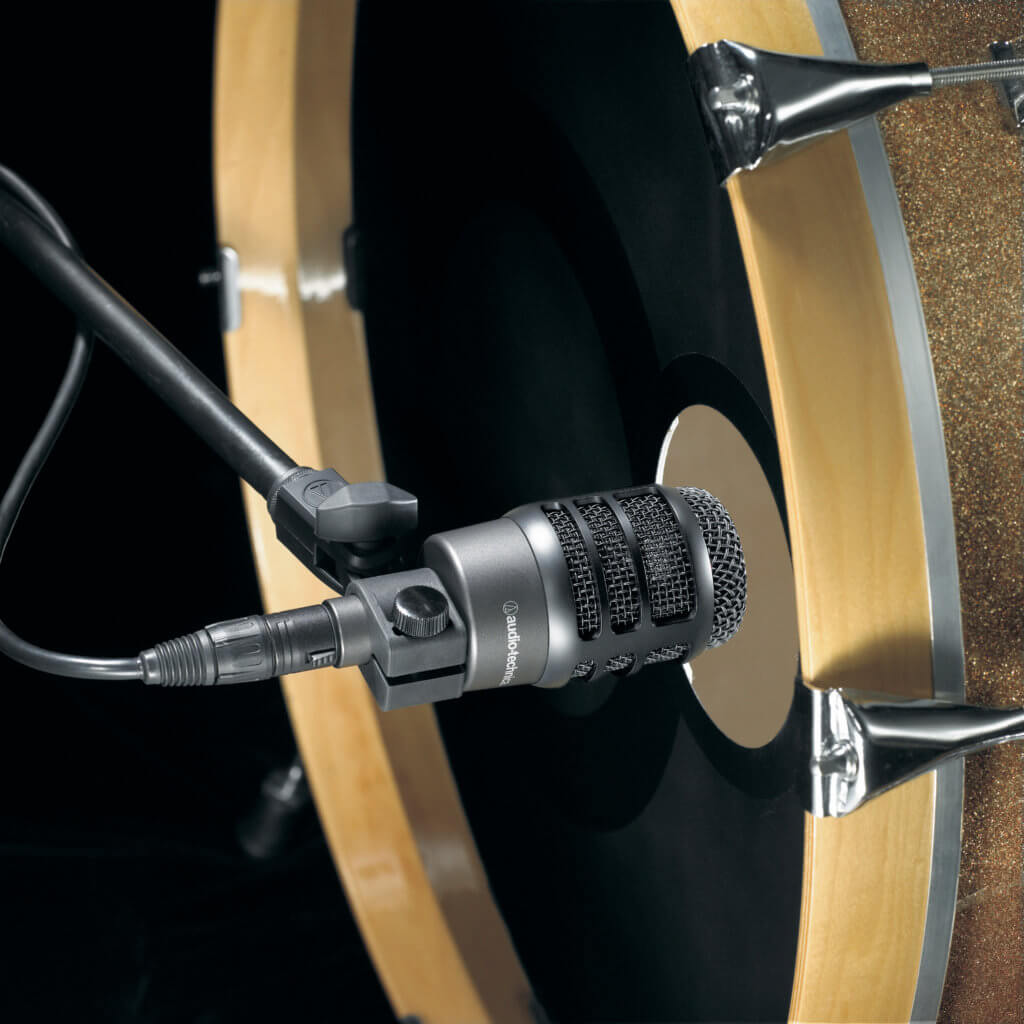
POSITIONING MICROPHONES AND TECHNIQUES TO RECORD KICK DRUMS
Here are some additional tips from our friends at Audio-Technica on kick drum recording techniques:
- For the inside mic, dead-center placement is actually not optimal. An off-center approach to placement will assist in capturing a stronger low-end kick.
- Feel free to experiment with how close and far you position this inside mic from the head; this will alter attack and low-end, so adjust to taste.
- If you’re placing a secondary mic in front of the resonant head, try keeping it away from the direct center of the hole so it’s not picking up too much of the batter head.
- You can opt for a dual-element cardioid instrument microphone, like the AE2500, which will capture the top end attack with its dynamic element, and the lower frequencies and thump with the condenser portion.
CLOSING THOUGHTS
Now, keep in mind this is simply a primer to get you thinking about how to record drums in your studio. We hope this installment provides some helpful tips when it comes to miking up your snare and kick drums for your next session. In future installments, we’ll tackle the rest of the kit plus effects, so stay tuned (no pun intended).
Until then, be sure to check out the entire range of Audio-Technica instrument microphones here and follow Audio-Technica on Facebook, Twitter and YouTube.