This brief article is designed to give some basic ideas about soundproofing your home studio. I personally have built three studios from the ground up and learned a lot as I have done so. There is a wealth of information including Sound Control Tables (STC) and a great variety of sound control products available online and I encourage you to check further, after reading this, to find the best combination for you.
Soundproofing is a term most often used to refer to the reduction of sound pressure (sound level). Controlling sound levels is essential to the operation of a studio. It may be that you need to control the volume of the sources that you are recording with respect to your neighbors or it may be that you are trying to reduce the sound levels from outside of your studio so as to not interfere with your recordings or, more likely, both. There is nothing worse than tracking that perfect vocal only to have a motorcycle roar by and ruin it. The key is to eliminate sound transmission as much as possible through your walls, floor and ceiling. So, where to start?
WALLS & FLOORING
Ideally you are building your studio as new construction. Doing that, you can design your walls from the outset for soundproofing. But, if you are converting existing space, there still are steps you can take to control sound levels. Let’s first look at new construction.
If you are on a slab, your finished flooring needs to be de-coupled from the slab. You can do this by floating the floor. To do this, you build a false floor that rests on rubber pads spaced evenly throughout the design. That way the concrete won’t transmit the sound because the floor is decoupled from the slab. If a floating floor isn’t practical then isolate the finished floor from your slab with a rubber or rubber cork membrane. Definitely not as good as the floating floor, but you will benefit over no isolation at all.
It is very important to also isolate or de-couple your floor from your walls. This can be accomplished by attaching rubber under the bottom plate of your walls. There are products specifically designed for this or you can go to a flooring supplier and buy a roll of the rubber/cork material used under carpets to control noise in apartments and cut that into strips. That same material is great under the finished flooring in your recording room and control room, too.
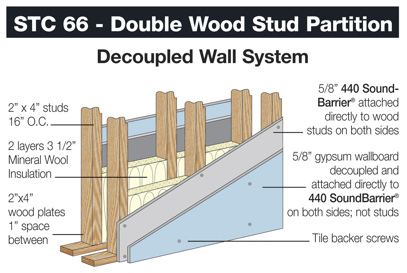
Next, let’s look at the design of your walls; that’s where your biggest challenge is. Here is what I did in my current studio and it has served me well. There are two walls separated by 1” of airspace. Each wall is insulated with rock wool (you can get this from an insulation supplier).
Each wall also has a double layer of 5/8” drywall with the inside double layer (facing the recording room) separated (de-coupled) by Resilient Channel. Additionally, between the wall studs and the first layer of drywall is a 1/8” rubber membrane. Pictured is a borrowed diagram showing most of these ideas using their 440 Sound Barrier product instead of the double 5/8’ drywall I used.
CEILINGS
For your ceilings, I suggest a double layer of 5/8” drywall attached to your rafters or trusses and insulate it. I used blown insulation with a factor of R-36. Finally, use an acoustic sound barrier sealant. This applies like caulking and helps seal the gaps at the bottom of your walls and other places you may have gaps. Note: Here is an important tip unrelated to soundproofing but an important element of studio design: make sure no two walls are parallel. This helps eliminate standing waves in your recording room.
CONVERTING EXISTING SPACES
If you are converting an existing space, you should try to incorporate as many of the steps above that you can. Building a second wall, inside of your existing wall, will serve you very well. If you can’t do that, attach resilient channel to your existing wall and then add your double layer of drywall. Glue them together with Green Glue (acts as a de-coupler) and attach with screws. Adding additional drywall to your ceiling will be necessary also. Green Glue that as well to de-couple the new layer from the existing one.
ACOUSTICAL TREATMENT
Now that you’ve done your soundproofing, it is equally important to do some acoustical treatment. This is for another article but here are the basics. Leaving your walls with the smooth painted drywall will result in a space that won’t sound very good; sound waves will bounce all over the place. There are a number of methods to use, from sound control blankets to attaching carpet to installing curtains or using acoustical treatment products like those from Auralex. Typical treatments include installing absorbing bass traps in your corners and adding absorptive panels spaced as needed to dampen the live-ness of the room, but not remove desired ambience. In many cases, you can send your room specs to acoustical treatment manufacturers and they will suggest designs incorporating their products.
Good luck and happy recording!
ABOUT THE AUTHOR
Jim Stafford is the owner of Eclipse Recording Co. in St Augustine, FL. For more info please visit Eclipserecording.com.