Recording and The Quest for Better Monitoring
WHAT’S YOUR WEAKEST SIGNAL LINK?
One of the most important aspects of engineering that you have to grasp is that quality can only be as good as the weakest link in the chain. I guess that could be said about many fields. In audio, hopefully the weakest link isn’t the players or the engineer! The two biggest problems are usually related to the least fixable cause: the room. We’ll get into discussing room issues in a later column; suffice to say, it’s a big issue!
Microphones and monitors are the next large bugaboo. These are particularly important, as they are your input and output of the whole process. And they interact with that nasty issue about the room. Today let’s focus on monitors. Understand this: there is no TRUTH. There is no such thing as the “best” monitor, or the most accurate monitor, or any other absolute. There are, however, crappy monitors, and crappy rooms.
REMOVE THE ROOM FROM THE EQUATION
In fact, a general rule of thumb is that if you can’t control (aka fix) your room to make it an accurate environment for listening, you’re better of removing it from the equation using headphones. Headphones are not ideal either – they can be inaccurate, cause ear fatigue, and present a detail and stereo image that is seductive but not really representative of what listeners hear through speakers. However, good (sub-$1000) headphones will always beat high-end speakers in a lousy room.
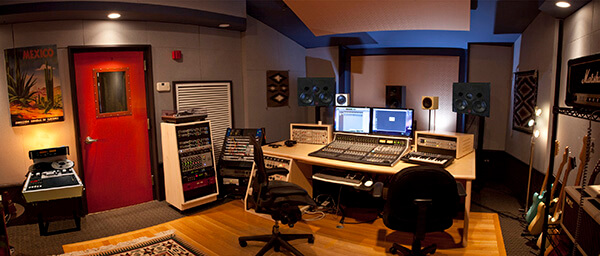
Let’s assume your room doesn’t suck (or reflect – sorry, engineer joke). Let me say again, this is a BIG assumption. (Have a look at the complexity of such a room).
What are the goals for your monitors? There are a few different potential goals that may be at odds with each other, and you’ve got to choose between them, or balance them.
WHAT IS ACCURACY?
First, they should be accurate, right? But what does that mean? We’re used to seeing graphs of frequency response, and we know that we’d like something that’s “flat”. Of course, nothing is flat. So you need to look for a response chart that has the fewest peaks and valleys, or that has them in less dangerous places. +/- 5 dB variance sounds like a lot, and it is, but realistically that’s what you’re dealing with. Here’s a look at a typical plot.
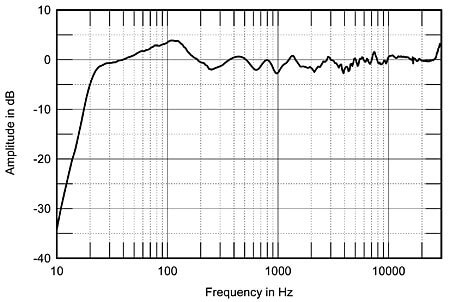
Try to avoid big changes between 80-160 Hz, 300-400 Hz, 1-2KHz; that’s your bass, you cloudiness zone, and your vocal presence ranges, respectively.
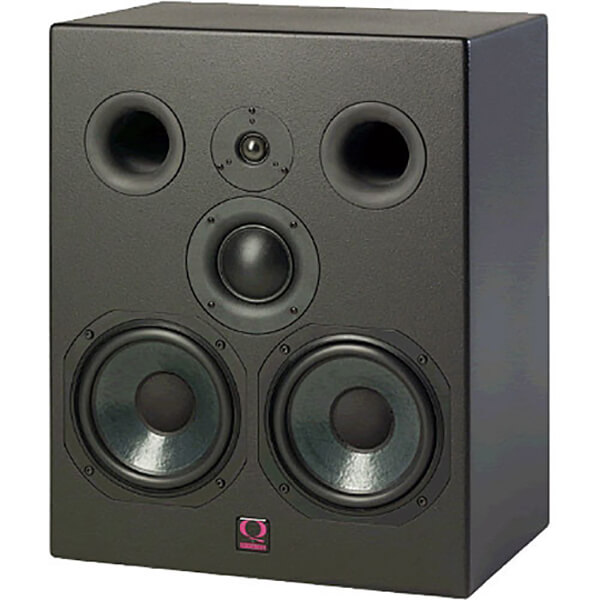
Flatness doesn’t tell the whole story. Phase accuracy is important too. Multi-way speakers (speakers with more than one speaker driver: a woofer, mid-range, and tweeter in a 3-way design, for example) can have phase shifts around the crossover frequencies (where one driver takes over for another). These may affect the frequency response chart, or may be masked in that measurement, but contribute to a “smearing” effect on what you’re listening to. Here’s an example of an excellent 3-way design. Note that the dual woofers and the ports still make it a 3-way.
HOW LOW DO THEY GO?
Most main monitors run out of gas between 40-50 Hz. For many situations, particularly for recording, that’s just fine. If you’re mixing, or mastering particularly, or doing EDM or other club music, however, you’re gonna need something deeper. In some cases, that means a subwoofer. However, you need to remember that a sub means another crossover point and all the potential BS that comes with that. It can be very time consuming to position and tune the sub to dovetail nicely with your main monitors. In many cases, a larger, deeper main monitor may be preferable.
Just how loud do they need to be? In most cases loudness shouldn’t factor into your thinking. You’re recording or mixing or mastering, not filling a gym or club. On the other hand, if you have clients who are used to hearing their competitors’ music in those loud environments, you might need to give some thought to making them happy. Of course, loudness requires power, and power is either cheap and distorted, or clean and expensive.
Often people try to compensate for their monitors by listening on many sets of speakers. I’ve always found this to be a difficult and imperfect solution. First, it really doesn’t work if you’re recording. If you’re recording you really should be focused on, well, recording. Or better yet, capturing brilliant performances. So you don’t want your gear interrupting that process.
If you’re mixing and you have all the time in the world, you can definitely get some ideas from listening on your computer, on earbuds, and in the car. In fact, I would always advise doing some of that. However, if you have clients, or deadlines, just want a smooth creative workflow, then this compensatory scheme is tough. Not only does it take you out of the studio and out of the creative headspace, but it’s often hard to make sense of the (sometimes conflicting) information you get. What do you do when the car sounds good but the computer is tinny? There is no TRUTH. So is a series of lies (OK, half truths) helpful, or is it better to get closer to a single truth? I’d argue that a good set of well-tuned monitors, albeit more expensive, will get you further than trying to sort through a bunch of confusion.
TESTING & ANALYSIS
Since no speaker is perfect, and we assumed that your room is good, ultimately we have to question that assumption, and test the speakers in the room. This can be done on the cheap with a test mic and frequency analysis software. In a pinch iZotope’s Ozone EQ or Waves’ PAZ will do. Be sure to use a test mic that’s calibrated and goes very low (oddly these are not super expensive) or else you’ll be measuring the mic’s limitations, not the speaker and room’s. Place the mic on a stand at the listening position, use a tone generator (usually available in your DAW, like Pro Tools) to send Pink Noise out each speaker, one at a time, and run the frequency meter on the input from the mic. Hopefully you can freeze the capture, or at least do a screen grab. Your result should look like Figure 2 a bit. Look for the bumps and dips. Move the speaker around the room until the trace is as flat as you can get it. Put the other speaker in the symmetrical location and take a read with both going. If it’s similarly flat, good. If not, then you’re gonna need to doctor the room!
ABOUT THE AUTHOR
Award winning mix engineer and producer Jordan Tishler runs Digital Bear Entertainment in Boston MA. A large Augsburger designed mix/overdub room with SSL console and racks upon racks of analogue outboard gear, tape machine, and gazillions of instruments, Tishler has credits including B Spears, JLo, Iggy A, MOTi, Justin Prime, SIA, and London Grammar. Contact me about producing your next record, or mixing the one you’re working on now! For more, visit www.digitalbear.com.