[SPECIAL NOTE: This article is brought to you by Amphion. To learn more about the entire range of Amphion home audio and studio speakers, please visit https://amphion.fi. Pictured above: Nate Furtado with Amphion One15 Studio Monitors]
![]()
Setting up a home studio holds the promise of creating your own great-sounding music any time the inspiration moves you. It’s exciting to buy new gear, claim a spare bedroom or basement, and embark on the production of your next masterpiece. If you’re like many home recordists, in your excitement to get started, you may not have paid as careful attention to the acoustics as you did to the rest of the recording chain. If the sound of your room is lying to you, there’s no way to make good choices for processing and balancing your music. If you can’t hear it, you can’t fix it.
1. SOUND ACCURACY & ISOLATION
The two issues to consider in the control room are the accuracy of sound reaching your ears, and prevention of noise from leaking into or out of your room. Similarly, in the recording space you want a true sound to reach the microphone, and isolation from adjacent spaces to prevent external sounds from polluting the recording, or your sound from interfering with the activities of others.
Isolation can be achieved in two ways: mass and de-coupling. The more mass a wall has, the less sound is transmitted. Mass Law is a rule of thumb that for every doubling of mass, transmission loss (TL) increases by 6dB. If a wall with one layer per side of drywall (GWB) stops 33 dB (TL33), increasing the mass to two layers per side would yield TL39, and doubling again to four layers per side should achieve TL45. It becomes evident that using mass alone can quickly get big, heavy, and expensive.
The best solution is to use mass in conjunction with de-coupling, which eliminates the physical connection between rooms. Since sound transmits more efficiently in solids (e.g. wall studs) than in air, building a double wall with independent, parallel rows of studs will increase TL without extra mass. Adding insulation to the cavity in-between further increases TL, as does spacing the walls farther apart. That TL39 wall with two layers of sheetrock per side can improve to TL57 when you put those layers on their own studs spaced an inch apart with insulation inside.
Double walls should have sheetrock outside only. Adding a layer to an interior side, even though increasing mass, creates a triple-leaf system that actually degrades performance, especially at resonant frequencies. If you’re curious why this happens, look up mass-air resonance and coincidence dip in your favorite search engine.
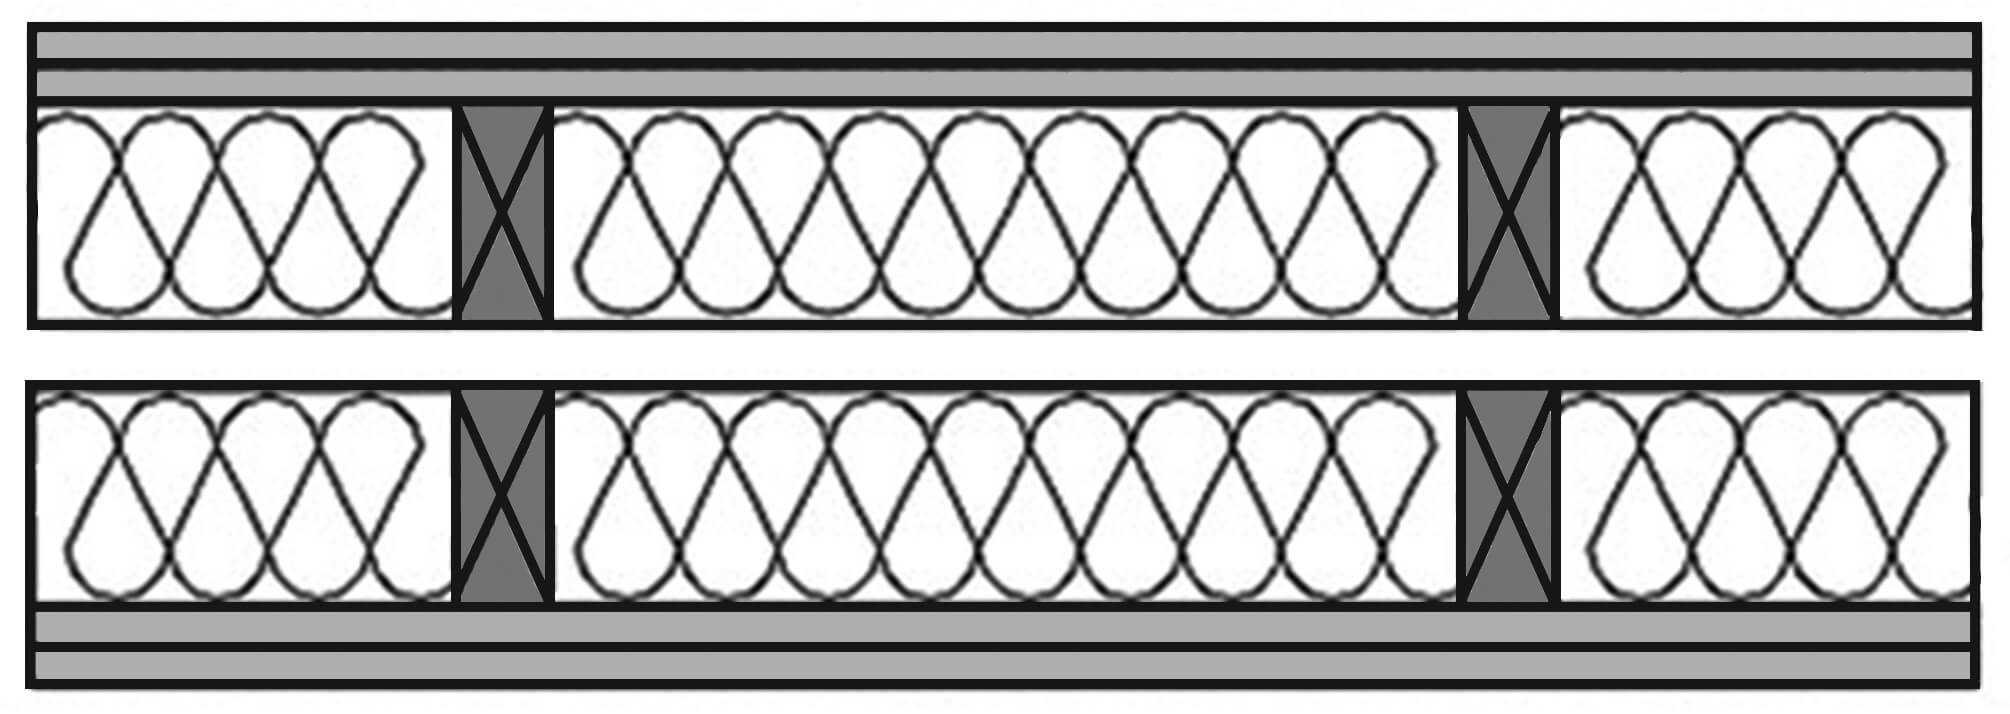
Double wall construction is often impractical for home studios. A simpler alternative is to use resilient sound isolation clips. RSIC-2 clips are a great option with hat channel (furring strips resembling the shape of a hat when viewed from the end) holding the drywall.
2. DON’T BE AN ISO FOAM DUMMY
Hanging foam on a wall for “soundproofing” is a fool’s errand. This will not increase transmission loss. Soft materials, like foam, fiberglass insulation, rockwool etc. serve only to absorb sound within a room, preventing reflections and reducing ambient sound. While ineffective for isolation, carefully placed absorption is essential for a controlled and accurate listening environment.
3. SPEAKER SETUP IS KEY
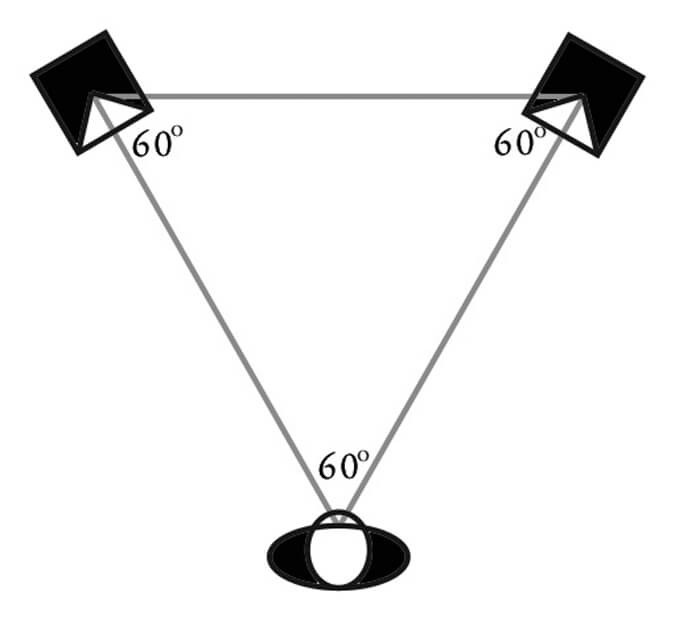
Before addressing room treatments, let’s go over some general guidelines for setting up speakers, like those designed by Amphion such as their One and Two Series monitors. A common technique is to arrange monitoring on an equilateral triangle with one point being the listening position and the other two points being speakers aimed at the listener at 60º angles. Symmetry is important. You don’t want to be twice as far from the left wall as the right, or rotated with one speaker farther from the front wall than the other. Try to keep some space between speakers and walls. Direct sound, following a straight path from speaker to ear, mixes in undesirable ways with reflections from nearby surfaces such as walls, tables, and mixing consoles.
The reflected path, from speaker to wall to ear, is longer than the direct path, resulting in a copy of the sound arriving just after the original. Sound is comprised of alternating higher and lower pressure, or in electronic transmission, positive and negative voltage. When a delayed signal combines with the original, one may be cycling positive, and the other, negative. These energies work against each other, reducing level at certain frequencies (destructive interference). Both signals being in a positive cycle results in reinforcement at some frequencies (constructive interference). Neither case is welcome because it changes the frequency response of the sound from your speakers.
pictured: MsM Engineer — Mix Engineer (Skepta, Mahalia) with Amphion One18 and Amphion Two18 Monitors, London, England
The easiest way to determine placement of treatments to absorb early reflections is to grab a mirror and enlist the help of a friend. While you sit at the listening position, your friend places the mirror flat on the wall, moving it until you can see a speaker. Center your treatments there. Sound and light travel in waves and reflect in similar ways (angle of incidence equals angle of reflection), so the mirror shows the first reflection paths from your speakers to your listening position. Ceilings, floors, and consoles also can be a source of unwanted reflections.
pictured: Amphion Two15 Passive Studio Monitors
4. TRAP THAT BASS
Low-frequency absorption, or bass trapping, is essential in small rooms, and acoustically speaking, any room in a house is a small room. Standing waves are a particular case of constructive and destructive interference between parallel walls causing certain frequencies to either ring or all but disappear at specific locations (anti-nodes and nodes). One node will exist exactly half-way between the front and back walls, so it’s best to have your listening position in front or behind the half-way point.
The poor bass response in un-trapped rooms contributes to many home studio mixes having problems in the low end. If you are missing bass at your listening position, you’re probably in a node. It may seem counter-intuitive to trap bass when you don’t have enough, but that’s exactly what to do. The missing bass is caused by sound bouncing between two walls, with the low pressure in one direction combining with the high pressure in the other, thereby cancelling each other out. If you trap the bass, it won’t bounce back, eliminating the cancellation and restoring an even bass response.
The simplest bass trapping is a thick porous absorber in the corners or on the back wall, often called a “super-chunk.” The classic material for these and many other absorptive treatments is Owens Corning 703 semi-rigid fiberglass boards in a frame covered with Guilford FR-701 fabric. The thicker the panel, the better the low-frequency absorption. Leaving a small space between panel and wall also improves low frequency performance. Four-inch panel depth gets you into the lower mid-range, but for real bass trapping, you’ll need it to be several times thicker.
These techniques won’t turn your home into Abbey Road, but they’ll help you get the most out of your gear and ears, presenting your music in the best possible light.
ABOUT THE AUTHOR
Jay Frigoletto is a recording columnist for Performer who’s covered such topics as Compression, Limiting, Equalization, Reverberation, Digital vs. Tape Delay, Active vs. Passive Electronics, Speakers & Crossovers, Tubes vs. Solid State, Microphones, Mic-Pres and Phantom Power, Phase and Polarity, and finally, All About Decibels. For more info please visit www.promastering.com.