Whether you are an amateur musician or entertainment is your full-time gig, this pandemic turned most of us upside down. And can I say it? Made us all panic a little.
Having a career in the arts relies heavily on the use of online tools for the sake of distribution and of course, marketing. All in all, hopefully your social media skills are looking pretty great by now in your career. As for online music stores, perhaps you have some music on Spotify and Apple Music along with live videos on YouTube…. great. Then the pandemic hit. WAH wah.
And everybody scrambled to find out a way to exist solely in an online format. And if you’re a touring artist (which I am), you were immediately asking “how do I successfully perform online?”
Let’s get to you to the place you need to be…and start here.
Why does the audio for live streaming differ so dramatically?
If you cannot tour, then live streams are you band’s only performance platform. Eeekk — feels wrong to say “only.” Maybe it’s better to say “only safe” platform right now. Ok… so, some people just go “Live” and strum their acoustic into their phone for Instagram…. or via their laptop or desktop for Facebook. Some of these raw/unplugged broadcasts actually sound surprisingly good. An excellent performance can be compelling no matter what quality it is. But often the audio sounds like a tiled bathroom, or the phone compresses weirdly for a moment for no reason or you can’t quite hear the vocals over the guitar. This describes about 90% of amateur or mid-level artist live streams. (And cough… this might be you right now. That’s cool. Not a dig at you, just an observation.)
But then, you stumble across a hit artist or maybe someone completely at random and …oh my gosh….somehow it just sounds A-mazing. Why is it so different to the unplugged broadcast?
What do I need to make my live broadcast look and sound good? And is it expensive?
Amateur broadcast tools needed:
-Camera – Phone or Computer
-Audio – Phone or Computer for built in microphone
-Internet
Midlevel —> Pro broadcast tools needed:
Camera – Phone or computer
Note: most iPhones and Androids you can adjust the camera so they are full HD or higher. Or you can buy an external camera for your desktop if the computer is great, but the camera is not. $90-$200 (optional if you need an external camera)
Audio
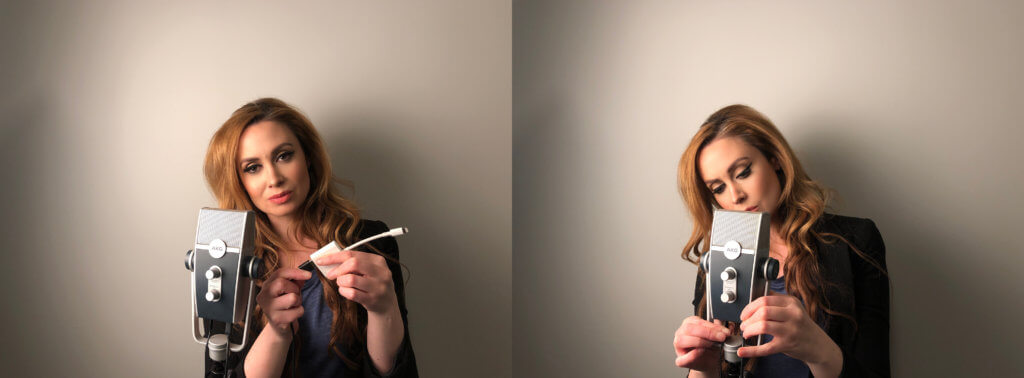
Get yourself a really great USB microphone. Even if have a pro set up with condenser mic, Pro Tools or Logic…. You’d be surprised at how useful a USB microphone can be. I own the AKG Lyra that has 4 settings, a mute button and is stereo. This will plug into your computer or phone to be used instead of the built-in variety. Price: $149.
Another great function of having a USB mic is for Zoom or podcasting or recording on the road — they are not very expensive ranging from just $99-$200. Between the Lyra and the Blue Yeti… you’ll be fine. And again, these are hardy tools of the trade so you can throw it in a suitcase if needed and not have a panic attack. Hahahah.
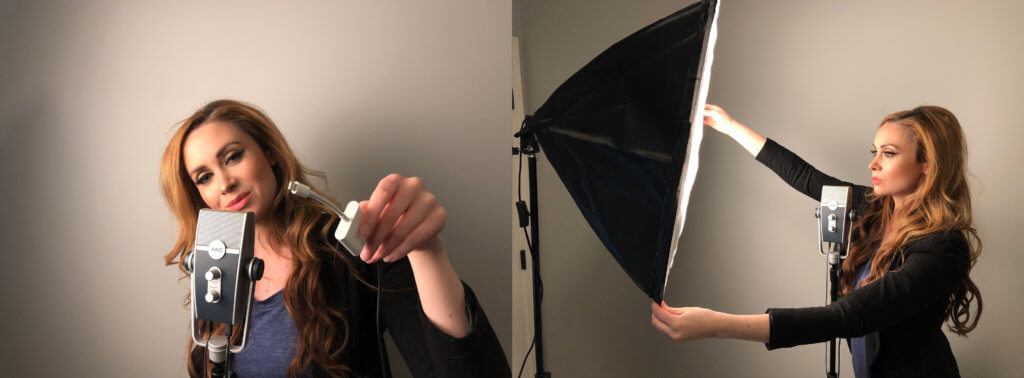
OTG cable
Ok, I’m not speaking another language. haha. This is a utility cable primarily for your phone. If you are planning to broadcast with your phone for Facebook or Instagram you will need this. It connects a USB microphone to the phone you are using. You cannot plug a USB cable into a small lightning port on a phone. I can’t speak for Androids as I have an iPhone, but I suggest this next part will be accurate for both phones. USB microphones CHEW POWER. Like most USB devices…they draw power from the thing they are plugging into. If you plug that mic into a laptop…no problems. If you plug into a phone… you are asking for trouble. So BUY an OTG cable with 2 inputs… one for the USB mic to plug into, the other for a lightning cable to charge it. Then both the phone and the mic are drawing power from an outlet. Thus… no crashing phone.
Fast Internet
Note: If using a desktop, preferably plug in via ethernet to ensure a smooth connection. If you are unsure how fast your internet is running go to speedtest.net and click GO. The most important number is the upload speed.
Lighting
Don’t roll your eyes. And furthermore, don’t think back at the amount of times you’ve gone “pffft” at ring light commercials or photos of friends using them. Pro lighting makes a HUGE difference. A ring light or pro box lighting can change a live stream or Zoom meeting from normal to celebrity worthy. $50-150
Backdrop
If you want to step it up one more notch go for a backdrop, too. Something plain or slightly abstract can create that blank slate behind you as you perform. No more half open doors/windows, cables on the ground, carpet that doesn’t match your outfit… have a Google and you’ll see.
Personally I bought a backdrop and some lights on Amazon about three years ago and I’m still using the same ones. I think I spent about $40 for two box lights and a backdrop and frame for an additional $60. All in under $100.
That seems like a lot, but if this makes you look and sound competitive on your live streams…. it’s worth Starbucks coffee for 6 months. Like you already did during quarantine…. So you can afford it now!!!
Now you have the gear, what do you do with it??
Next, we go through how to broadcast.
Technology has a learning curve and you cannot really afford to “learn” in front of your online audience where it may live forever on the web. My suggestion is Have a meeting with yourself.
Yes, that sounds bonkers….I am aware. Also glad. I got to use the word bonkers. Do you have Skype or Zoom? If not set up an account for Free. Let’s start this trial on a desktop where it’s not as small and fiddly as a phone to navigate. You’re also more likely to want to throw a phone if something doesn’t work right away. And less likely to throw a large iMac across the room.
Plug In. Strap in. We are doing this!!!
Plug the USB mic into your computer. Plug a set of earbuds or headphones into the USB mic. Now go to Computer Settings. Select the USB microphone as the sound device for Input and Output for monitoring through headphones (most USB mics allow this). “Check . Check.” Do you hear yourself through the microphone? If yes, move on the next step. If no… you must be glad you can’t through your computer across the room. Double check everything is plugged is and volumes are up, headphones are working. Restart computer and try again. Huzzah. Sound. The old “Off and On” again computer trick. Always works.
Next Open Skype or Zoom. Next run away and brush hair or put make up on… then run back.
Click “start a meeting”…. Yes, with yourself. Select the USB mic as the audio device. Zoom will prompt a test through for audio with a series of sounds and commands. I’m sure Skype does the same too.
Once sound is working, select the camera icon on Zoom or Skype and you should see yourself there. Also with these apps you can choose a fun backdrop for this very important meeting ahahah.
Practice makes perfect.
Next – time to play. Get a level. Get used to the microphone. I actually go as far to say play your entire set this way. Multiple times. I use in ears plugged into whatever audio device or USB mic I’m using so it sounds different. Anything that looks or sounds different is a learning curve that you do not want to be doing on camera in front of an audience. So practice , practice and then some more until you feel like it’s ‘normal’.
View this post on Instagram
Then set up your lighting and start to pay attention to the stage camera Frame. Is it bright enough? Flattering? Interesting to look at? etc.
Then start to play with the actual social media outlet you will broadcast to. Note: I am NOT SAYING go live. I am saying open up for example, Facebook and click the live button to see what looks different to Skype or Zoom before actually going Live. It will look relatively the same. But check that you can select the microphone, that you can “Name” your broadcast… yeah that. So it’s not just So & So is going live. Name your show and input any information that is relevant or ways to tip you on PayPal or Venmo. You may find it useful to create a word document on your computer that has all of this information ready to go. So when you are about to go Live for real it’s just a copy & paste. No spell check needed.
For Instagram it’s almost the same thing, but you’re plugging into your phone or iPad. Test the screen, that you can hear the microphone plugged in. And check your frame as you are in Portrait mode… not landscape… so it will look different. Make sure you are far enough away to fit in the frame in a flattering way. But close enough to read comments if you wish to do that during a live stream.
Then you are ready to do a livestream!!! Start short. Make your first live stream a short 1 or 2 songs… or possibly even just an announcement. So you can check that everything is working… then after the fact, check that everything sounded and looked the way you wanted it to. Good luck to you. You are now operating on a professional level for live-streaming. Thanks for reading.
ABOUT THE AUTHOR
Katie Cole is an Australian musician currently based in the Nashville area. She has been a touring musician with Smashing Pumpkins for over five years, and if you’d like to learn more about her, please visit http://www.katiecoleofficial.com